Golden Road - Mango Cart
I created this mock advert as a personal project.
I was heavily inspired by the Truly - Summer Flavors campaign. By GS&P and Buck.
Tools used: Models from Turbosquid. Houdini for condensation, running drips, bubble advection, and FLIP fluid simulation. Cinema 4D for scene layout, animation, and look development. Redshift for rendering. Davinci Resolve for compositing render passes and color correction. SFX and music from Envato Elements put together by me.


The bubble advection was done in Houdini. I simulated billowy smoke emitting from the can with some custom forces, then I scattered points onto the resulting simulation and assigned spheres of varying sizes. Exported out of Houdini and into Cinema 4D.
The beer fluid is a FLIP emitter with it's direction and velocity being driven by a curve force in Houdini. After the initial simulation I scattered points within the volume of the fluid and assigned tiny spheres as bubbles. To get a crisp look I enabled motion blur on the fluid, but did not enable the blur on the bubbles. With motion blur on both objects, the detail of the bubbles was entirely lost.
This shot was done in Cinema 4D. I used the old rigid body tag. I set up the Mango as a collider and the cans were placed in a cloner with the rigid bodies tag. I set a small amount of follow position and follow rotation. As well as I went to the Soft Body tab and selected "Made of Clones" and set Structural: 1, Shear: 1, Flexion: 10. This results in the clones attempting to revert to their original positions as a cohesive object.
The beer simulation was done in Houdini using FLIP. I made an emitter and a flat plane which I rolled slightly into a cone/tube shape and extruded it's width to prevent particles falling through. After I cached the simulation I scattered points onto the volume of the fluid and assigned small spheres to them to create bubbles. I used the same trick as before with the motion blur as to not lose the detail during the rendered animation. That being motion blur on the pouring fluid, no motion blur on the small bubbles.
The final shot was the first shot I started this project with. With no real prior experience I began to learn Houdini via youtube, google searches, and the Entagma patreon. This condensation rig took 3 months for me to make. But it can be applied to any object, the running drips remove the static drops along it's path, and it can generate wetmaps that are made via UVs and not based on geometry. The whole reason I made this was because I didn't want to pay for X-Particles. Which I know is silly, but it forced me to take the plunge into learning Houdini. And it made me a better 3D artist in the process.
If you want to do something similar and already have X-Particles just buy this rig from Sam Tato and save yourself 3 months of headaches!
If you want to do something similar and already have X-Particles just buy this rig from Sam Tato and save yourself 3 months of headaches!
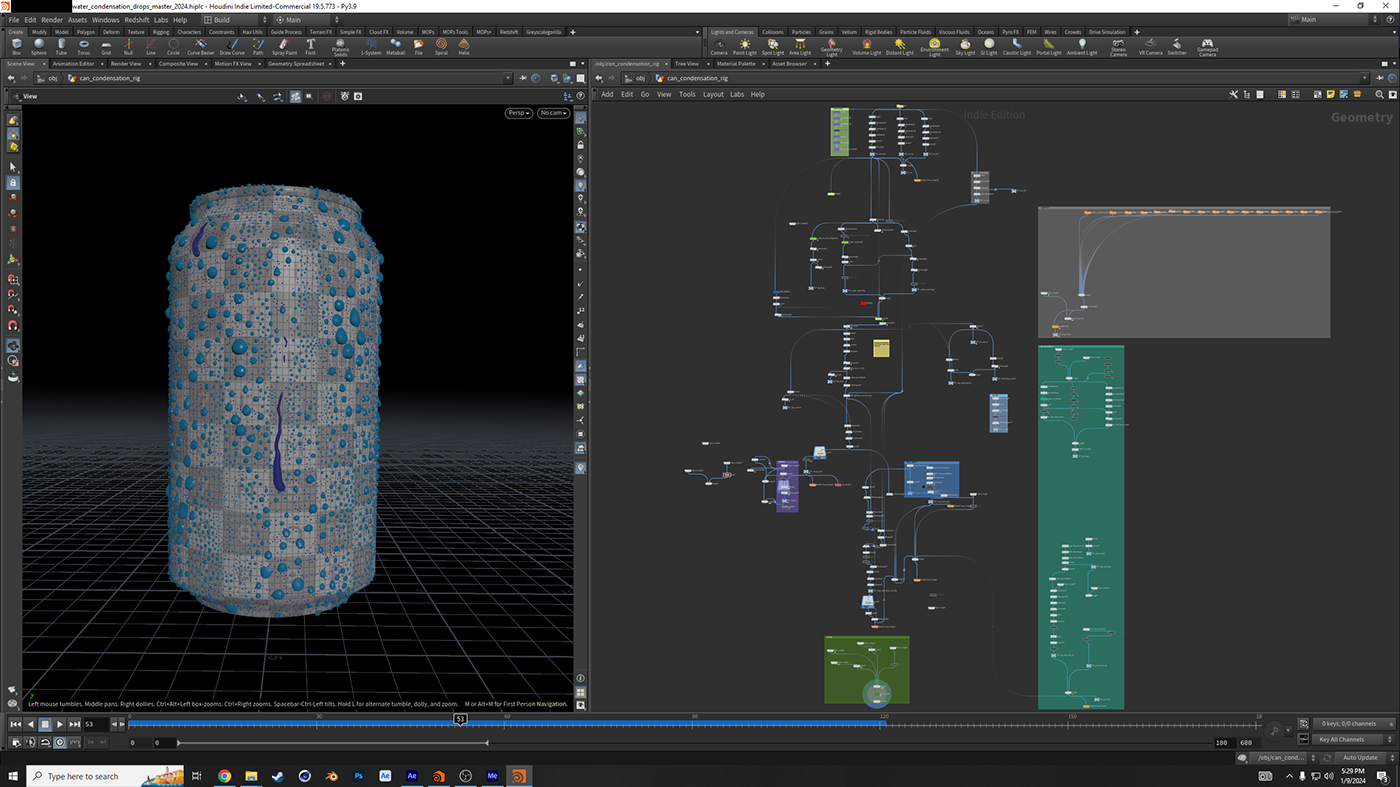
Houdini node layout.
Houdini Condensation Particle System.
Wetmap generation using Evan Rude's free wetmap generator:
https://evanrude.gumroad.com/#MjjQc
Exported out as a bitmap sequence using COPs.
https://evanrude.gumroad.com/#MjjQc
Exported out as a bitmap sequence using COPs.

Scene layout and animation done in Cinema 4D. I pushed the RS proxy system to the limit to see what I could bring over from the Houdini condensation rig. I was able to move hundreds of thousands of condensation drops with their animation over in a fast and efficient way. The can's condensation RS proxy file was at it's limit and even with "preview mesh" selected it wouldn't display the resulting geometry. Though you can see the bounding box active.

Regardless, it shows up in render and that's all that mattered. This allowed me to export out the running drips as an alembic so my scene file wasn't extremely bogged down and slow to work with. Trying to export the entire condensation system as an alembic resulted in an unusable slow scene file due to the massive amounts of polygons. RS proxies saved the day!

The main can shader was derived from multiple other complex shaders all blended together and masked out by the wetmap generated in Houdini and exported out in black and white using COPs. I used Greyscalegorilla materials as a starting point and customized them to my needs. I started this project out before various updates to Redshift which now make this process a lot easier.


